• Portfolio
  • PATTERN STORE!
  • Books
  • Errata
  • Pattern Filter
  • blog
  • Publicity
  • Videos
  • Yarn Calculator
  • about
  • contact
  • Fairs & Contests
Crafty Intentions
  • Portfolio
  • PATTERN STORE!
  • Books
  • Errata
  • Pattern Filter
  • blog
  • Publicity
  • Videos
  • Yarn Calculator
  • about
  • contact
  • Fairs & Contests

Crafty Seamstress Intentions: Butterfly Wings

I've made butterfly wings several times.  I love the idea of easy-to-use, not-easy-to-outgrow, dress-up clothes for kids.  Butterfly wings are perfect.  If they slip on to arms, and have loops of elastic for wrists or fingers, they are all of those things I mentioned above.  Today you can find cheapy light weight Butterfly wing scarves on places like Amazon and Ebay.  If you add a couple of Pacifier clips to the neckline of the scarf, you can clip it to a kids shirt and then you'll have your own happy butterfly.  Or you can try to do it the hard way.  I needed to do it the hard way for my son's Halloween costume one year.  He was so into the Very Hungry Caterpillar, and I knew he'd love running around screaming that he was a VERY BEAUTIFUL BUTTERFLY, but I also knew I'd have to make it basically identical to the book to be appealing to him.

2013 The Very Hungry Caterpillar Butterfly Wings Halloween Costume-01.jpeg

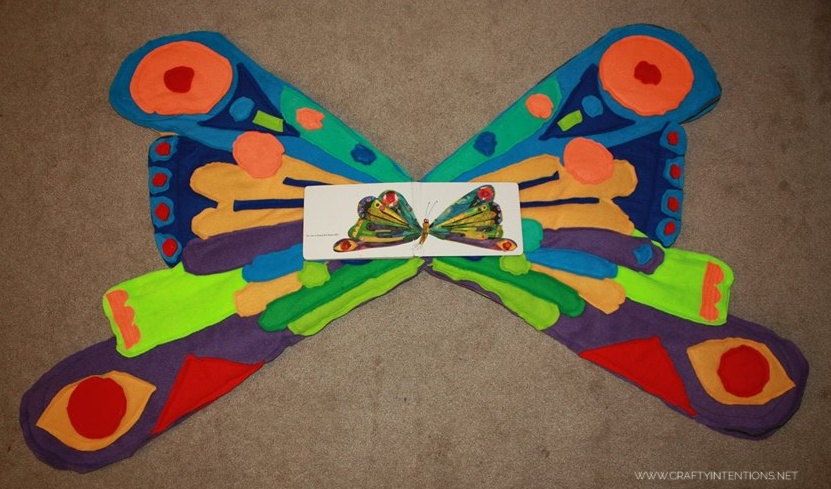
This was a lengthy process of cutting up two pairs of every piece of fleece, sewing it to a middle-felt & batting sandwich, and making sure that everything colorful was exactly repeated on each front and back of each left and right wing.  It came out looking great, I think.  But at the same time, it's like a heavy blanket.  Using pacifier clips to clip it to his arms didn't pan out, because it was just too heavy.  I ended up sewing it directly to a cheap orange sweatshirt, and I'm a little sad about that because I am very pro-reusability.  But, it was the only way to fully support the weight of these wings!  If I had to do it again, I don't have a better idea of how to get it done.  Maybe paint a sheet instead?  Hmm.  But he was thrilled.

2013 - Beautiful Butterfly 2-01.jpeg

I had these grand visions (Before making these wings) of making beautiful piecey handmade butterfly wings that you clip onto a child for INSTANT magic.  But... Like I said, it turned out to be a lengthy process.  I tried it again using lighter weight fabric (Not fleece) on Felt, sandwiched between felt cut out to showcase the fabric underneath.  And I glued the blue fabric in place using fabric glue.   However, it ended up feeling like WAY too much glue, gobs and gobs and buckets of glue.  And then I lined it up with a piece of felt and cut out felt windows to showcase the blue fabric beneath... but this was tedious and difficult.  I ended up overstitching the top and bottom felt pieces into place (It looks the same from both sides of the wings, so it was 3 layers of felt total, 2 layers of glued blue shiny fabric).

It turned out decently well, but way too much work and time to be able to make something like this in bulk -- so this is the last version I made!

It was still a hit!

2014 Butterfly Wings Cape 2-01.jpeg
tags: Butterfly Wings, Costume, Clip on, Hungry Caterpillar, Crafty Intentions, Sewing, Gluing
categories: Halloween, Sewing
Monday 01.21.19
Posted by Megan Lapp
 

Halloween Costumes!

Since my children were born, I have done a new Halloween Costume every year and most have been handmade.  There have been rules and guidelines for these costumes that I follow.  1) They must be Cold-weather friendly.  2)They must match when I have more than one child.  3) I prefer book-related costumes.  This year they are finally making individual requests (She wants to be a Pink Cat,  He wants to be Max from Where the Wild Things Are - (Revisited, as you'll see below), Sigh), and I will no longer get to choose.  So to celebrate 8 years of Halloween Costumes done my way, I would like to share those costumes with you!

Year 1: Astronaut [Bonus costume!  First Ever!]

Hand-assembled... Yes, I put my precious baby's head on a plate in service of looking like an astronaut.  I stand by my actions.

2010 - Astronaut.JPG


Teddy Bear [Official Halloween]

Store bought, hand-altered.

2010 - Teddy Bear 1-01.jpeg

Year 2: Monster [Official Halloween]

Hand made all the way!  ... Mostly by my mom.  Though I did  do the adult hoodie decorations myself.

2011 - Monster-01.jpeg

Year 3: Max, Where the Wild Things Are [Official Halloween]

I store bought the one-piece pajamas.  I hand-made all the detail (added the feet/paws, buttons, ears and tail.  Made the crown with fur edging)

2012 - Max-011.jpeg

Skeletons [BONUS Costume! aka My Daughter's first costume!]

Pajamas with skeletons from Carters, Shirt for me with Skeletons from Etsy

2012 - Skeletons-02.jpeg

Year 4:  The Very Hungry Caterpillar and The Very Beautiful Butterfly [Official Halloween]

The Hungry Caterpillar handmade from fleece as a slip on costume (sandwich board style) over top green pajamas.

2013 - Hungry Caterpillar-01.jpeg

The Very Beautiful Butterfly with a store bought Orange sweatshirt and handmade butterfly wings from fleece.

2013 - Beautiful Butterfly 2-01.jpeg

Year 5:  Sorcerer's Apprentice & Minnie Mouse [Official Halloween]

Sorcerer's Apprentice Mickey was cheapy knit winter gloves and a golden rope I found at a craft thrift store.  My Mom made the hat, I added the ears.  I sewed the red robes!

2014 - Sorcerer's Apprentice 2-01.jpeg

Minnie Mouse was a machine stitched Red white-polka-dot dress from a pattern on Etsy with lots of petticoat material and lace underneath, over a black long sleeved t-shirt and leggings.  I made the ears from felt and bows attached to hair clips!

2014 - Minnie 3-01.jpeg

Bonus Costume!  I was particularly ambitious this year and made homemade costumes for the Renaissance Fair for both kids! 
Flynn Rider utilized leggings, a white button down shirt, this free pattern for boot covers using microsuede material, and a Flynn Rider vest of my own making!

2014 - Renaissance Prince 1-01.jpeg

Renaissance Fair princess was made using the same pattern as the Minnie Mouse dress, just with some alterations for the over-lay!

2014 - Renaissance Princess 2-01.jpeg

Year 6: The Cat in the Hat and Fox in Socks [Official Halloween]

Both costumes used store-bought solid-color one-piece pajamas.  The fox in socks used 2 pairs of blue soccer socks, and handmade ears and tail.  The Cat in the Hat costume used a store-bought hat and gloves and handmade belly and tie.

2015 - Cat in the Hat and Fox in Socks-01.jpeg

Year 7: Superman and Wonder Woman [Official Halloween]

Superman was store bought 100%.  Wonder Woman was partially store bought, and partially handmade.  I added glow in the dark stars, I altered store bought accessories to fit her. 

2016 - Superman and Wonder Woman-01.jpeg

Year 8: Peter Pan and Winter Tinkerbell [Official Halloween]

Peter Pan was store bought.  Tinkerbell was almost all handmade!  I bought a hair-bun, as we had cut her hair short, and I bought green boot covers.  I found light-up fairy wings at a yard sale.  The Dress was made from an adult sweatshirt, and extra large pipe cleaners.  Brown accents are lengths of elastic!

2017 - Peter Pan and Tinker bell-01.jpeg
2017 - Tinkerbell-01.jpeg
2017 - Peter Pan and Tinker bell 2-01.jpeg
tags: Halloween, Costumes, Sewing, Handmade, Crafty Intentions, Where the Wild Things are, Minnie Mouse, Mickey Mouse, Princess, Sorcerers Apprentice, Teddy Bear, Skeletons, Monsters, Hungry Caterpillar, Butterfly, Wonder Woman, Superman, Fox in Socks, Cat in the Hat, Tinkerbell, Peter Pan
categories: Sewing
Monday 10.01.18
Posted by Megan Lapp
 

Powered by Squarespace.