
Fox pattern! Now, I didn't just wing this. I did write it down. But... Is it good enough to publish it? Would you want to make one like this? I'm undecided about whether or not it's worth actually typing up, testing, and publishing. Hmm...
Confessions in Winging it: Jake and Lady Rainicorn
I have a bad habit, every once in a while, of making a thing, and not writing down what I did so that I can make the thing a second time. This is one of those times.

After binge watching most of Adventure Time, I decided to make a Jake and Lady Rainicorn hat for some loved ones. They do not watch Adventure Time. Make note: Attempt to make gifts referencing pop culture only for people who are familiar with said pop culture. I'm very proud of how they came out, and I would happily share the pattern with you but...
I winged it.
Featured Pattern: Flumplebees!
This is a pattern by EssHaych!
You can find it here: https://www.ravelry.com/patterns/library/the-flumplebees
It's worth a couple of dollars for sure! It's a short simple pattern, easily made, beginner level, very cute, and it creates an adorable, very imaginative creature! I can use just about any imaginably solid or variegated yarn for this one. At my last craft market, I sold out of these little guys. Every single person who asked about them was delighted by the name "Flumplebee" and insisted on taking one (or three) Home!
Now, I made a few alterations to my construction. I add a wire in the body that reaches all the way from the nose to the butt so that you can re-position the head and neck. I also add some glass gems at the bottom of the butt to weigh it down and make it sit securely (but both of these things can be completely left out to make the thing 100% toddler safe). I like sizing up the eyes a little bigger than what they recommend in the pattern, but that's just personal preference. I also sometimes piece in a mane of yarn and it makes them look like wayward fuzzy flowers to me!

Autism and Crafting
So, my now (today!!) 8 year old son is Autistic. He has a significant communication delay and has difficulty with verbal interaction. He has had early intervention since he was 2, has been in ABA preschool from 3-5, and special education classrooms from 5 years old onward. He has a PCA (an adult with him at all times in school to keep him safe, and focused on his work). Specifically he's what's called "Hyperlexic" which means he's been able to read since he was 2, but he has difficulty with spontaneous verbal communication. He's been obsessed with letters and numbers from a very, very early age.
He is a lot of work, but I also feel quite lucky. I know everybody says something like that, but I'm not trying to be all rainbows and sunshine. He is quite affectionate and sweet. His heart breaks when kids get upset nearby him - he can't tolerate tears or sadness. He's gentle with animals and smart as a whip. He's enthusiastic about playing and fun, and absolutely loves music (he has Hamilton memorized). There are moments, even days or weeks, when it is difficult to connect with him... but for the most part, that's easy.
When I make gifts for him, I try especially hard to make sure it's going to be something that really makes him light up.
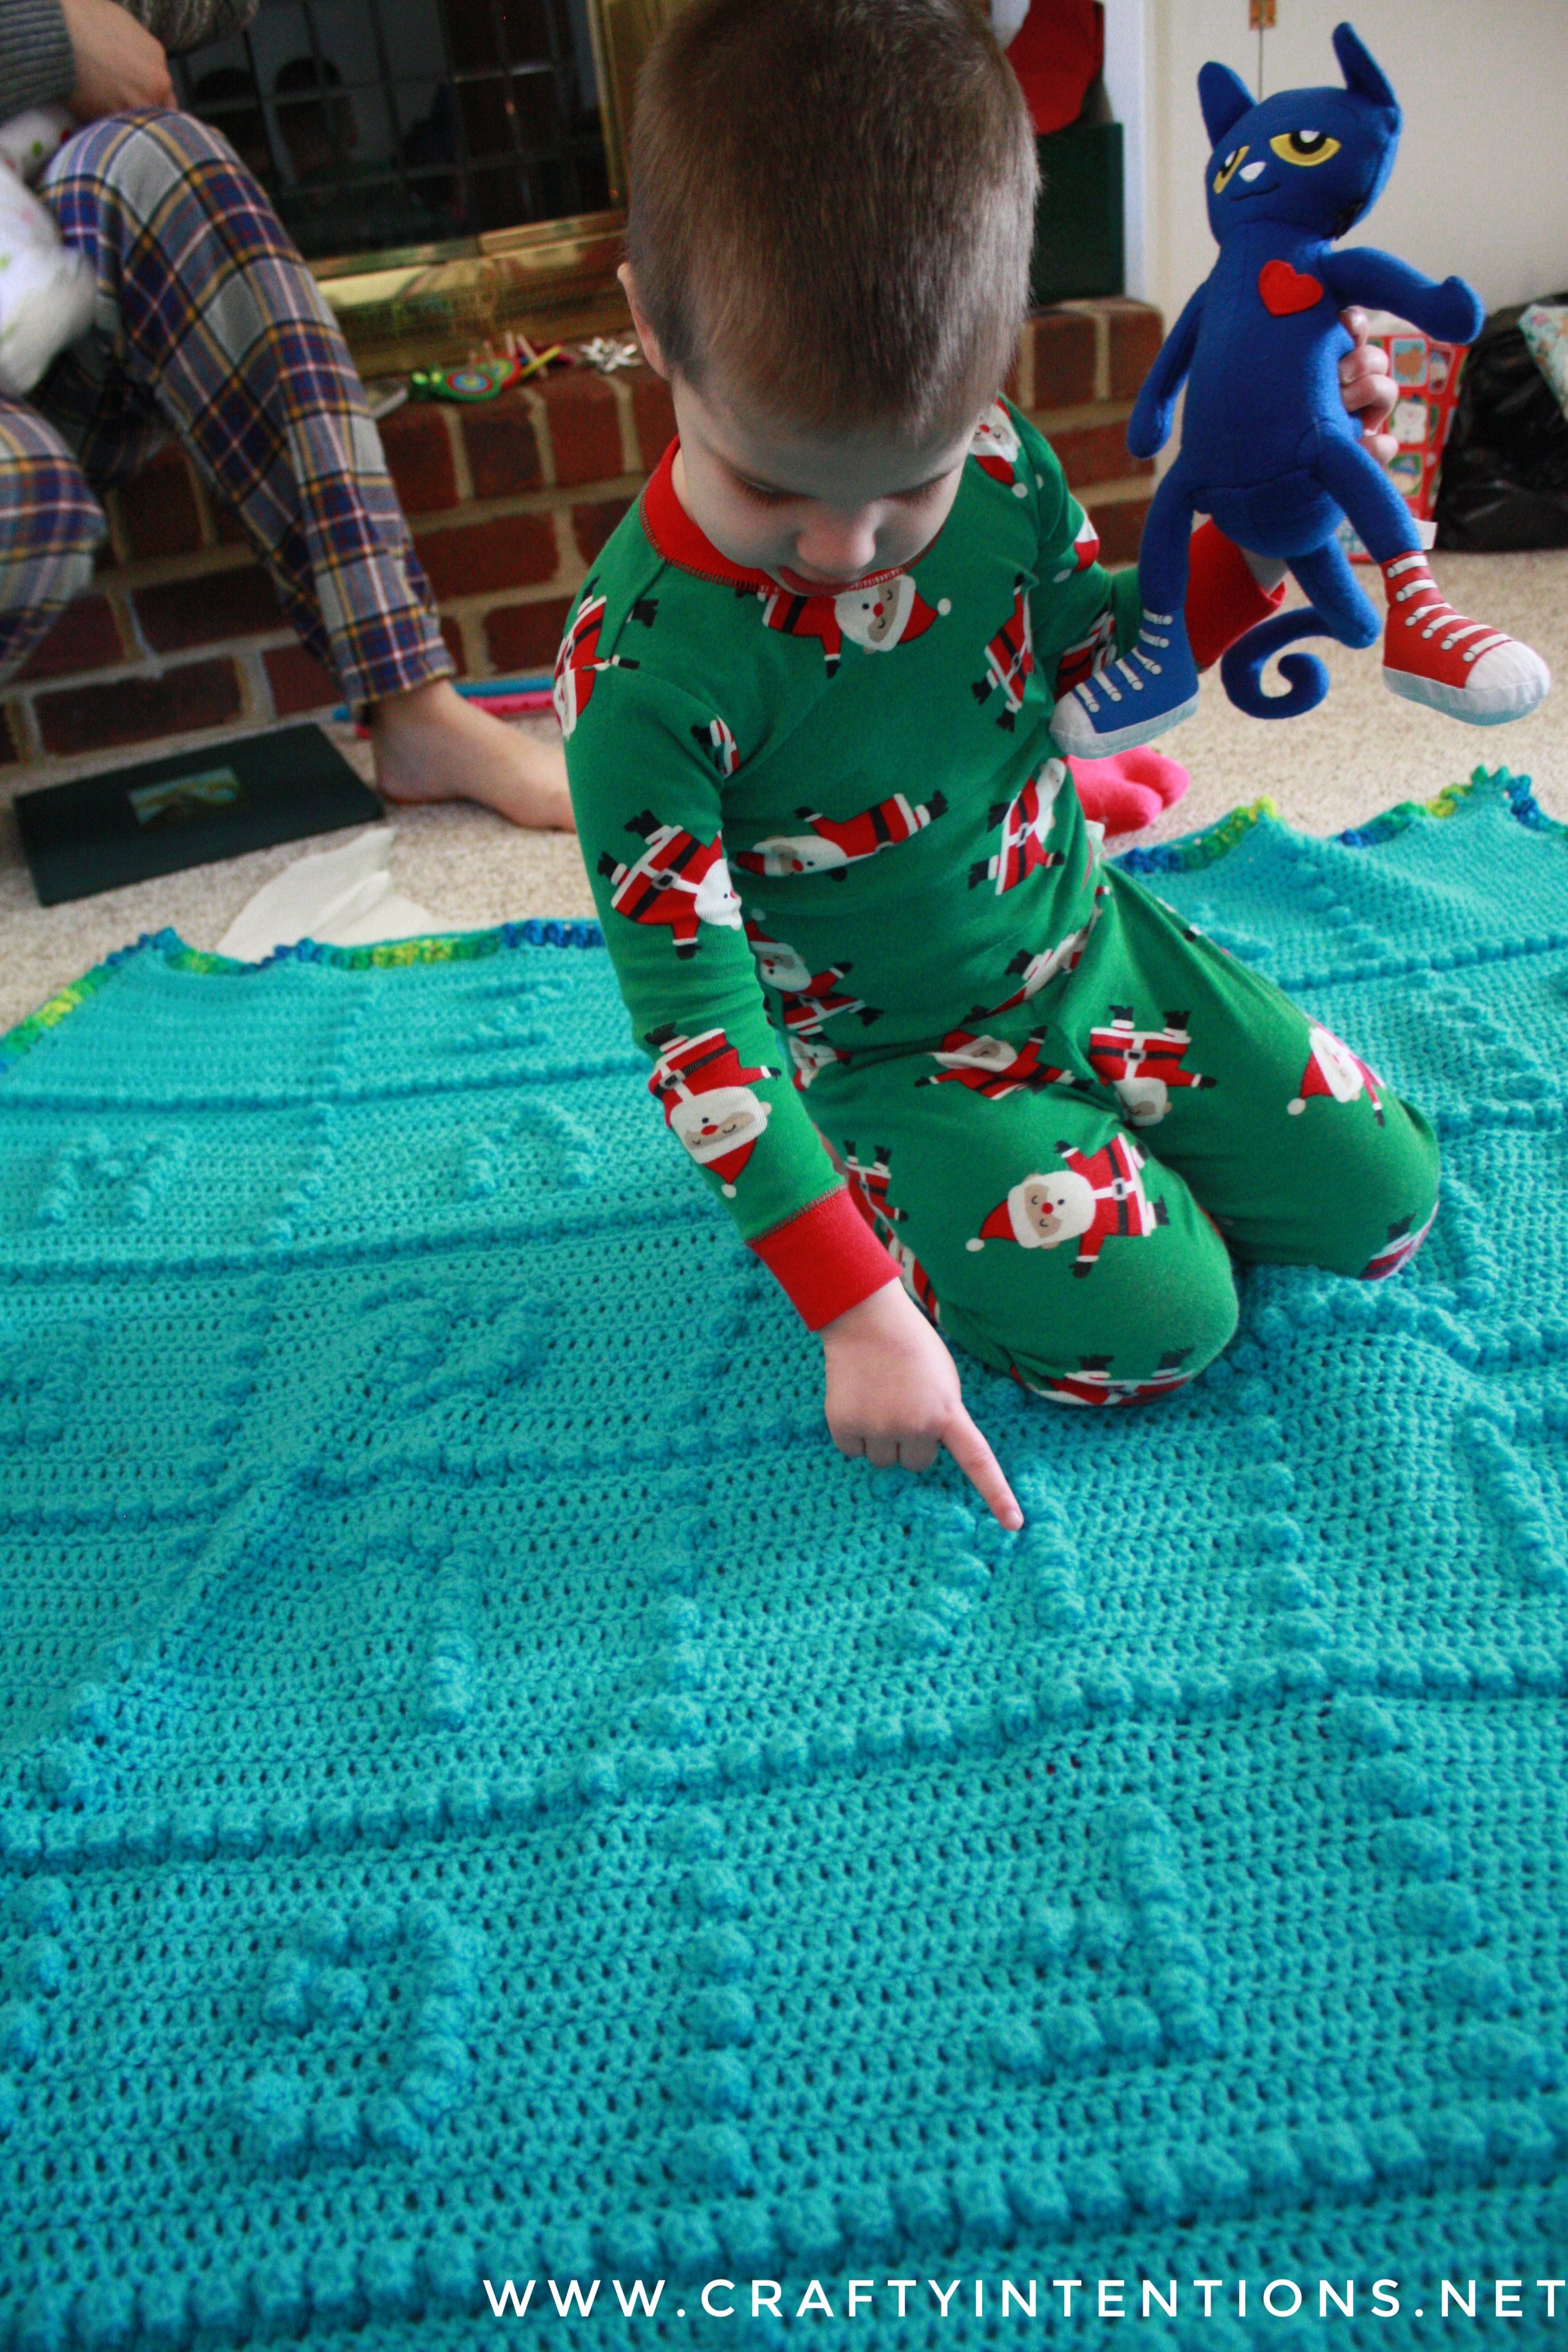
Here's the pattern I used for this one: https://www.ravelry.com/patterns/library/babys-abcs-afghan
It worked great! He was finally able to literally wrap himself up in the alphabet, and roll around on top of it. He traced those letters all day and gave me a big hug for this one. This was a total success!!
Baby Quilts
I have found crib-size quilts the easiest quilts to make. They are just big enough to enjoy a design or have fun with putting together a color scheme... maybe even experiment with some new quilting designs... But they are not big enough that they become over-burdensome. Also, newborn babies are SUPER easy going about gifts. Even if you make a mistake, they will NEVER mention it... mostly because they won't be able to talk for a few years.


Satisfied customer.
Crafty Intentions: Failed Results, Part 3: Lace Skirts

So, there was an extended period of time when I couldn't stop adding lace to tiered skirts. By hand, pre-sewing machine.
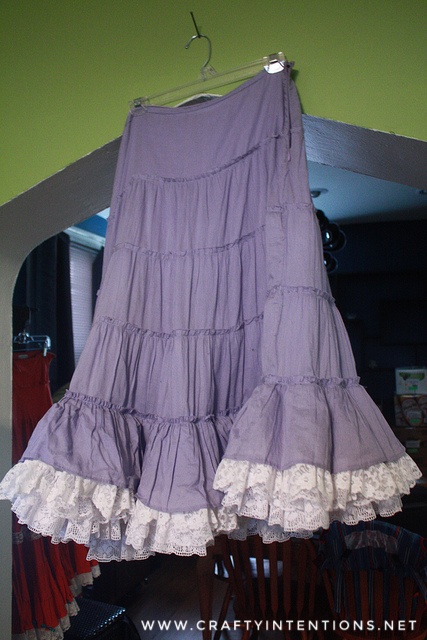
They were all (thrift)store bought skirts. I was so sure I would wear them all the time, but it turns out that my office job didn't think these were very "Office-Appropriate" and they ended up taking up a lot of poofy unnecessary room in my closet.

It still took me about 10 years to officially re-home them to a local craft re-use store in hopes that a more adventurous soul would wear them regularly and give them the love they deserve.

I didn't wear them often, but when I did I sure felt fancy. It's too bad I didn't get more use out of them. Also sewing all that lace on with tiny hand stitches took FOREVER. I enjoyed it, and it certainly led me to feeling confident enough to attempt to begin my rainbow king sized quilt, which is what led to me getting a sewing machine... But I'm sad this wasn't a craft that made something I really used.
Octopus Pattern EXPLAINED
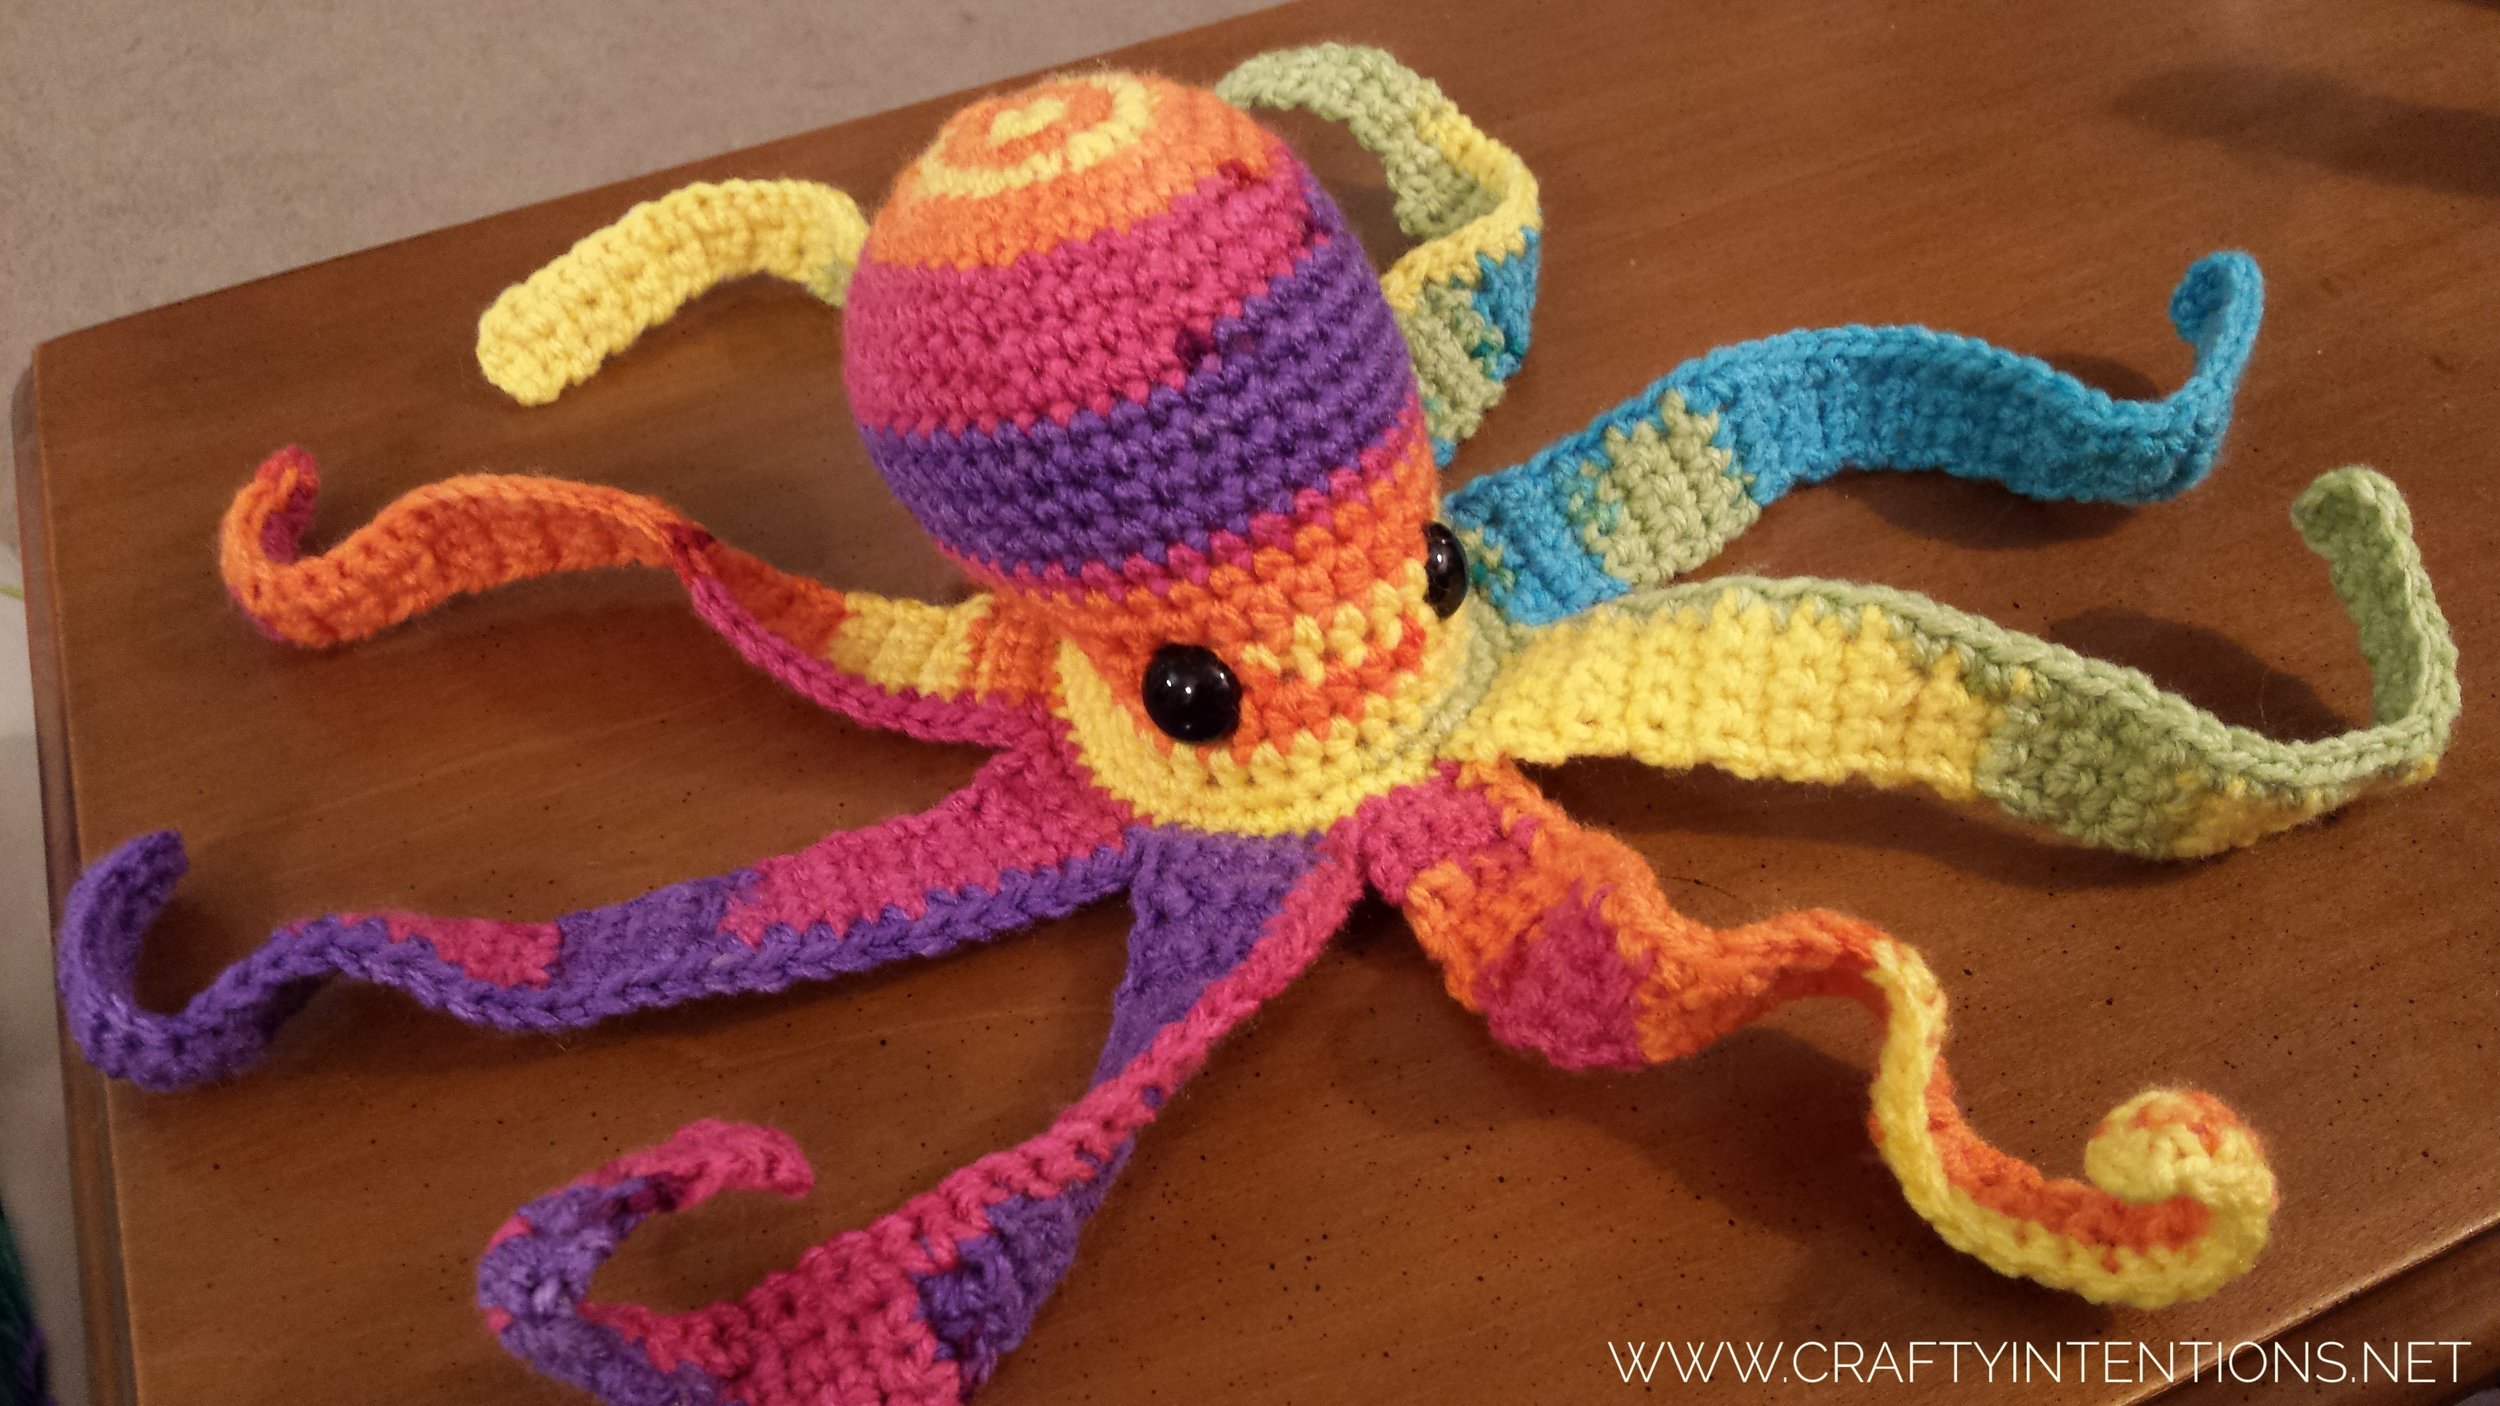
The simple octopus (As pictured above) is crocheted in one piece. You add safety eyes, stuff the head and crochet a disc and sew that on the bottom of the octopus to seal in the stuffing. This is a very quick piece and is perfect for easy toys to sell at craft fairs or a simple gift for a kid. Felt on the eyes to make it toddler-friendly.

The complex octopus (as pictured above) is crocheted in two solid pieces, which are then crocheted together around the entire edge using single crochets. The body of the octopus can be as firmly stuffed as you want. This takes longer than the simple octopus, but achieves a nice realistic look with the suckers/bobble stitches!
© 2017 Megan Lapp, Crafty Intentions™. All rights reserved. This pattern is FOR PERSONAL USE ONLY. The pattern (or parts of it) may not be reproduced, distributed or resold, translated, published, altered, shared or posted (for sale or free) over the internet or offline. You can sell items made from this pattern, provided they are handmade by yourself in a limited number and you give credit to the designer. Please add the following lines to your item description and any item you are selling: “This item is handmade by (your name) from a design and pattern by Megan Lapp, Crafty Intentions™”.
Mermaid Unicorn Inspiration

The idea to invent a crochet pattern for a Mermaid-Unicorn Hybrid creature was inspired by many different sources, first and foremost was the mythology of the Hippocampus. Greek and Roman myths have always been fascinating for me, so seeing the Merhorses depicted at the Trevi Fountain was a vivid memory.
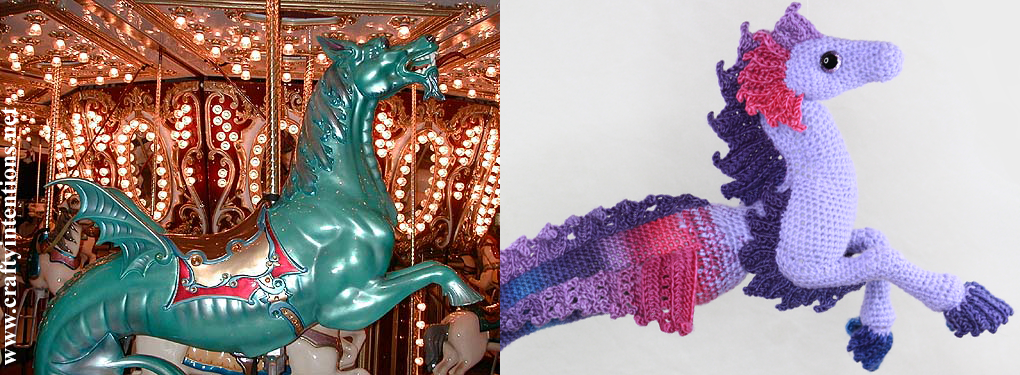
Another source of inspiration was the carousel horses from the fantastic hand carved carousel at Fantasy Island in LBI, NJ. My family would visit LBI every year as a child, and I had one carousel horse that I was very particularly loyal to, and my brother had a favorite as well. I would ride the one adorned with roses, he would ride the dragon. Looking back, the dragon was VERY Merhorse-ish.
And once I started Looking, I found a tremendous amount of inspiration on Deviant Art.
I'm so glad I did, because I'm really quite proud of how the pattern turned out and I absolutely love seeing everyone's unique versions!

Go Here for more: https://nambroth.deviantart.com/art/Hippocampus-22624615
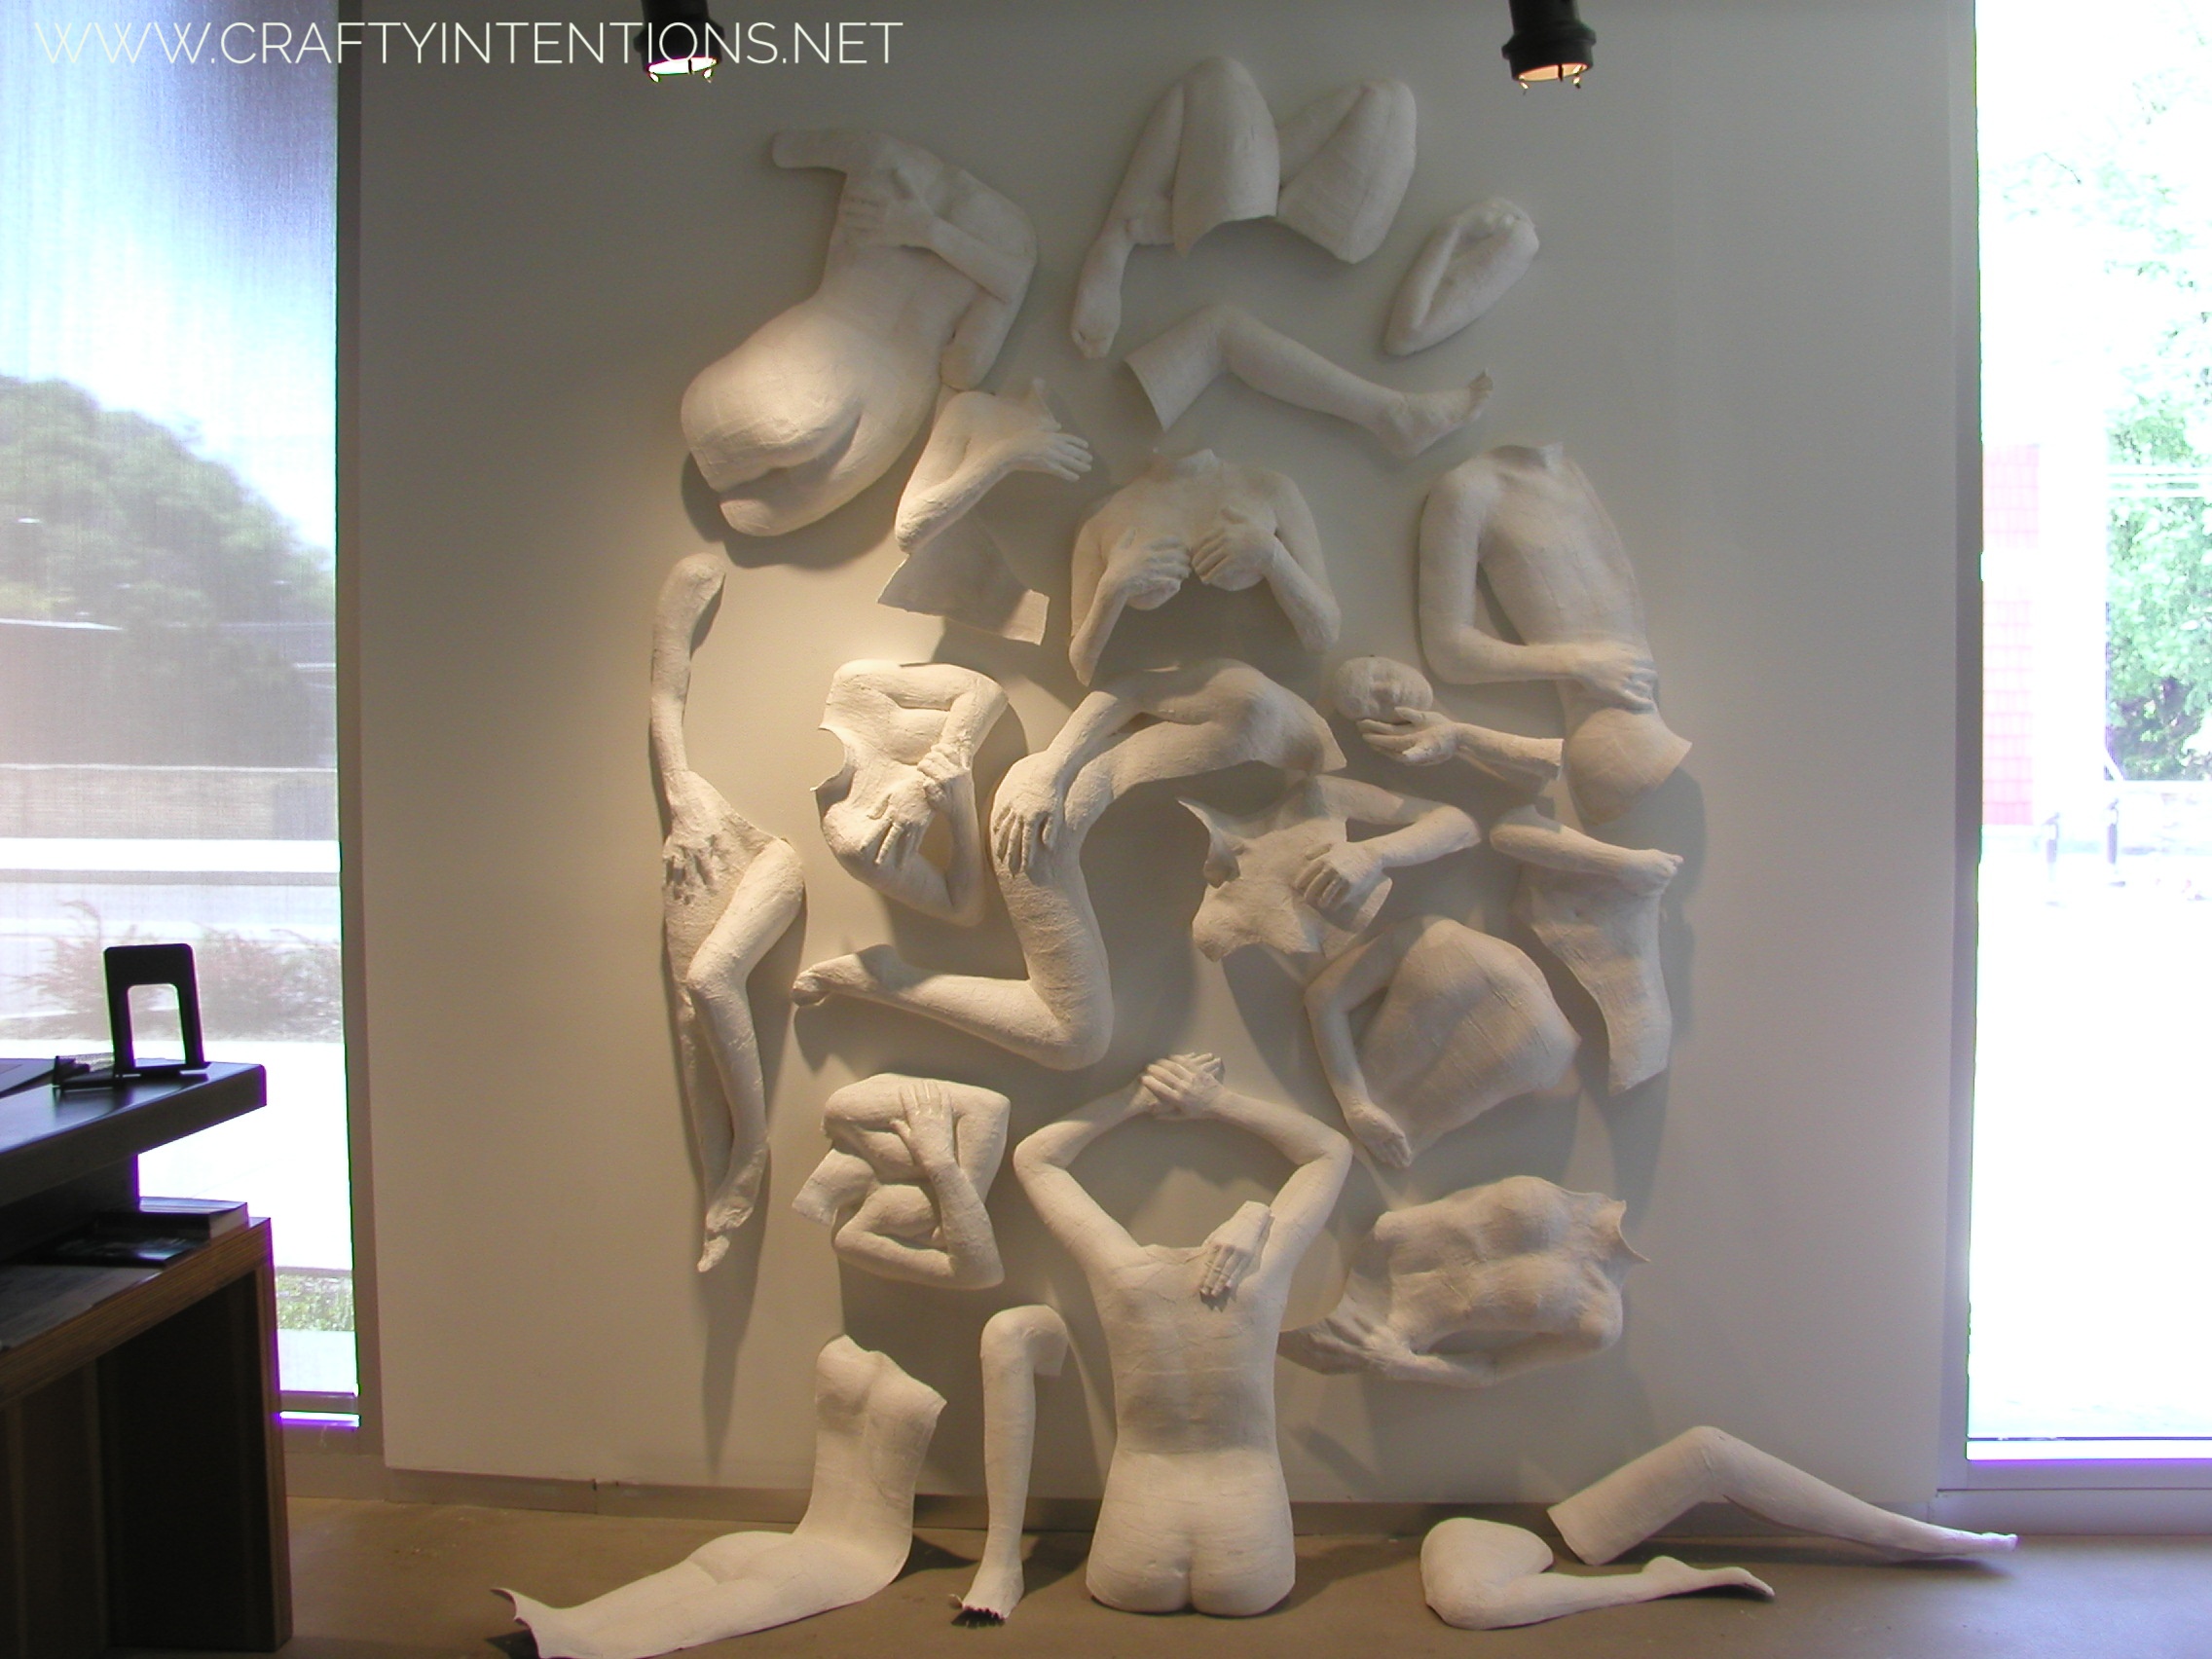
Crafty Intentions: Early Days

I've been making things and creating things as long as I can remember. It took me until years past college to find fiber arts. Here's a (slightly embarrassing?) glimpse of my college Honors Thesis. Looking back, I wish I had gone further with it. I wish I had made hundreds of casts, instead of a couple dozen. I wish I had painted some of them instead of leaving them all white. I wish I had really focused on making them GROW from each other and from the wall.... But, I still graduated with honors. It was certainly a special project to me. Go Lafayette! Go Pards!
Crafty Intentions: Failed Results, Part 2: Cupcake Icing Caulk
At some point I developed a burning desire to make cupcakes. Not real cupcakes, mind you. I do not cook or bake. Fake cupcakes. Fake, perfect looking cupcakes. First, I needed to figure out how to create perfectly little whipped icing spirals. How do you do that?
Maybe by piping three dimensional paint in an icing bag through a fancy tip?

No, that's not it. They came out yellowed and pock-marked.
What about spackle? Would that come out whiter? Fluffier?
Decidedly not.
How about Modelling paste? (Also a construction-type material)

Success-ish? Achieved the whipped cream white-color. Fail on the texture. They turned out brittle and hard and very matte. I wanted a shiny delicious look. This was not it.

I ended up doubling down and piping a whole truckload of modelling paste into tiny cupcake foils. For what purpose? Mmm, hard to say. Somewhere there is a whole box of these guys just tucked away for a rainy day in my house. Definitely a journey that could have ended a whole lot sooner than it did.
Crafty Intentions: Quilting Edition
My first quilt was a BIT ambitious. It seemed like a good idea, at the time, to start out with a King Sized scrap-pieced Square-make-up Rainbow Extravaganza.

It was not a good idea.
In fact, I didn't even own a sewing machine when I started working on it. My husband nearly had a nervous breakdown watching me painstakingly hand stitching scraps together and did his own research and bought me one. I did not want a sewing machine. I didn't like machinery and doo-dads and it seemed complicated and unnecessary when I could hand-stitch just as well. What a n00b I was.
Sewing machine turned out to be a pretty awesome idea. But even with the sewing machine the Quilt (Started in 2008) it would still take 7 years to complete.

It took me a year to piece together every square, and then another year to join every square into the quilt top. In my defense, in that time I also had a baby. This is us cuddling on the completed quilt top, circa 2010.

Then I basted the quilt with batting and a backing, folded it up SUPER nicely.... and put it away for 4.5 years. My sewing machine barely made it through piecing the quilt top together. There is NO WAY she would have made it through the quilting process. I thought about sending it out to be quilted by a professional, but why pay money when you can be super stubborn and declare that NO ONE WILL QUILT THIS BUT ME. In 2015 I met a new breed of sewing machine: A cast Iron Antique. My new Singer 201-2 aka Marceline was DESTINED to quilt this thing. So we did.

Slowly. And Painfully. But I did it. And then I hand sewed the edging. And then, I declared victory by cuddling the same (now 5 years larger) baby in that same (NOW COMPLETE) quilt.

Dragon Pattern Inspiration
Like everyone, I find inspiration in all kinds of ways from lots of different things. I was Pinterest-ing before Pinterest existed by saving internet images to a dedicated USB drive that I took everywhere with me! I'd like to show you some of the things that influenced the Dragon Pattern.

The entire Pern series by Anne McCaffrey had a huge impact on me and how I imagine dragons. My only regret is that Jewel Faceted safety eyes do not exist! I searched the internet high and low and found no such thing.

I have definitely been inspired by the work of Dragons and Beasties. Their little polymer dragons are just so adorable and with a really attractive clean design.

Lastly, the dragons of Windstone editions have always been a source of fascination for me. My father has had a couple of them up on the mantle since I was a child, and they always looked real to me!
What's Next for Patterns?
There are several ideas in the queue for next published pattern! I am in process making wings for a standing Pegasus! I am still deciding between making the body a wide, chesty clydesdale sort of an equine, or a more delicate, spindly sort of creature. We'll see!!

I intend to eventually create ever flavor of flying mythological creature, so completing the Pegasus will certainly advance that agenda. Phoenix is very high on that list!
In that vein, I would also love to do some equine babies! I want a foal Unicorn and Pegasus, and a little baby Mermaid-Unicorn Hippocampus as well!!

See more of this artists work here: https://krisztianna.deviantart.com/
I am part way through the creation of a Ball toy for little ones or babies. It'll be a great way of learning new stitches without committing to a whole blanket! This way you can make a little sweet heirloom toy for that new baby in your life, and learn something new at the same time!! Pretty cool, right??
I am 2/3rds of the way finished with a trio of Ocean-themed Mini-patterns. I just need a 3rd concept to go with Tiny Octopus and Tiny Mermaid! What should their third buddy be? I'm still not sure!!
Lastly, I have a concept for a cuddly tentacle eyeball monster, and I'd like to do that justice with wings and a tail. I was originally inspired after making THIS fantastic pattern by Terry Ijams, and I'm excited to write down and publish my own (very different) version.

Broken Update
My hand is free of my cast, but the doctor and therapist assures me that it'll take at least a month of slow stretches and exercises before my hand is back to approaching normal. Right now my joints feel stiff and sore, and although I can crochet I have lost my stamina. It only takes a short bit of crocheting till my arm and hand feel exhausted. I think I may have pushed a little too hard this past weekend and now I'm dealing with lingering soreness. I have hope that it will get better, but goings are slow.
0/10. Would not recommend breaking your hand.
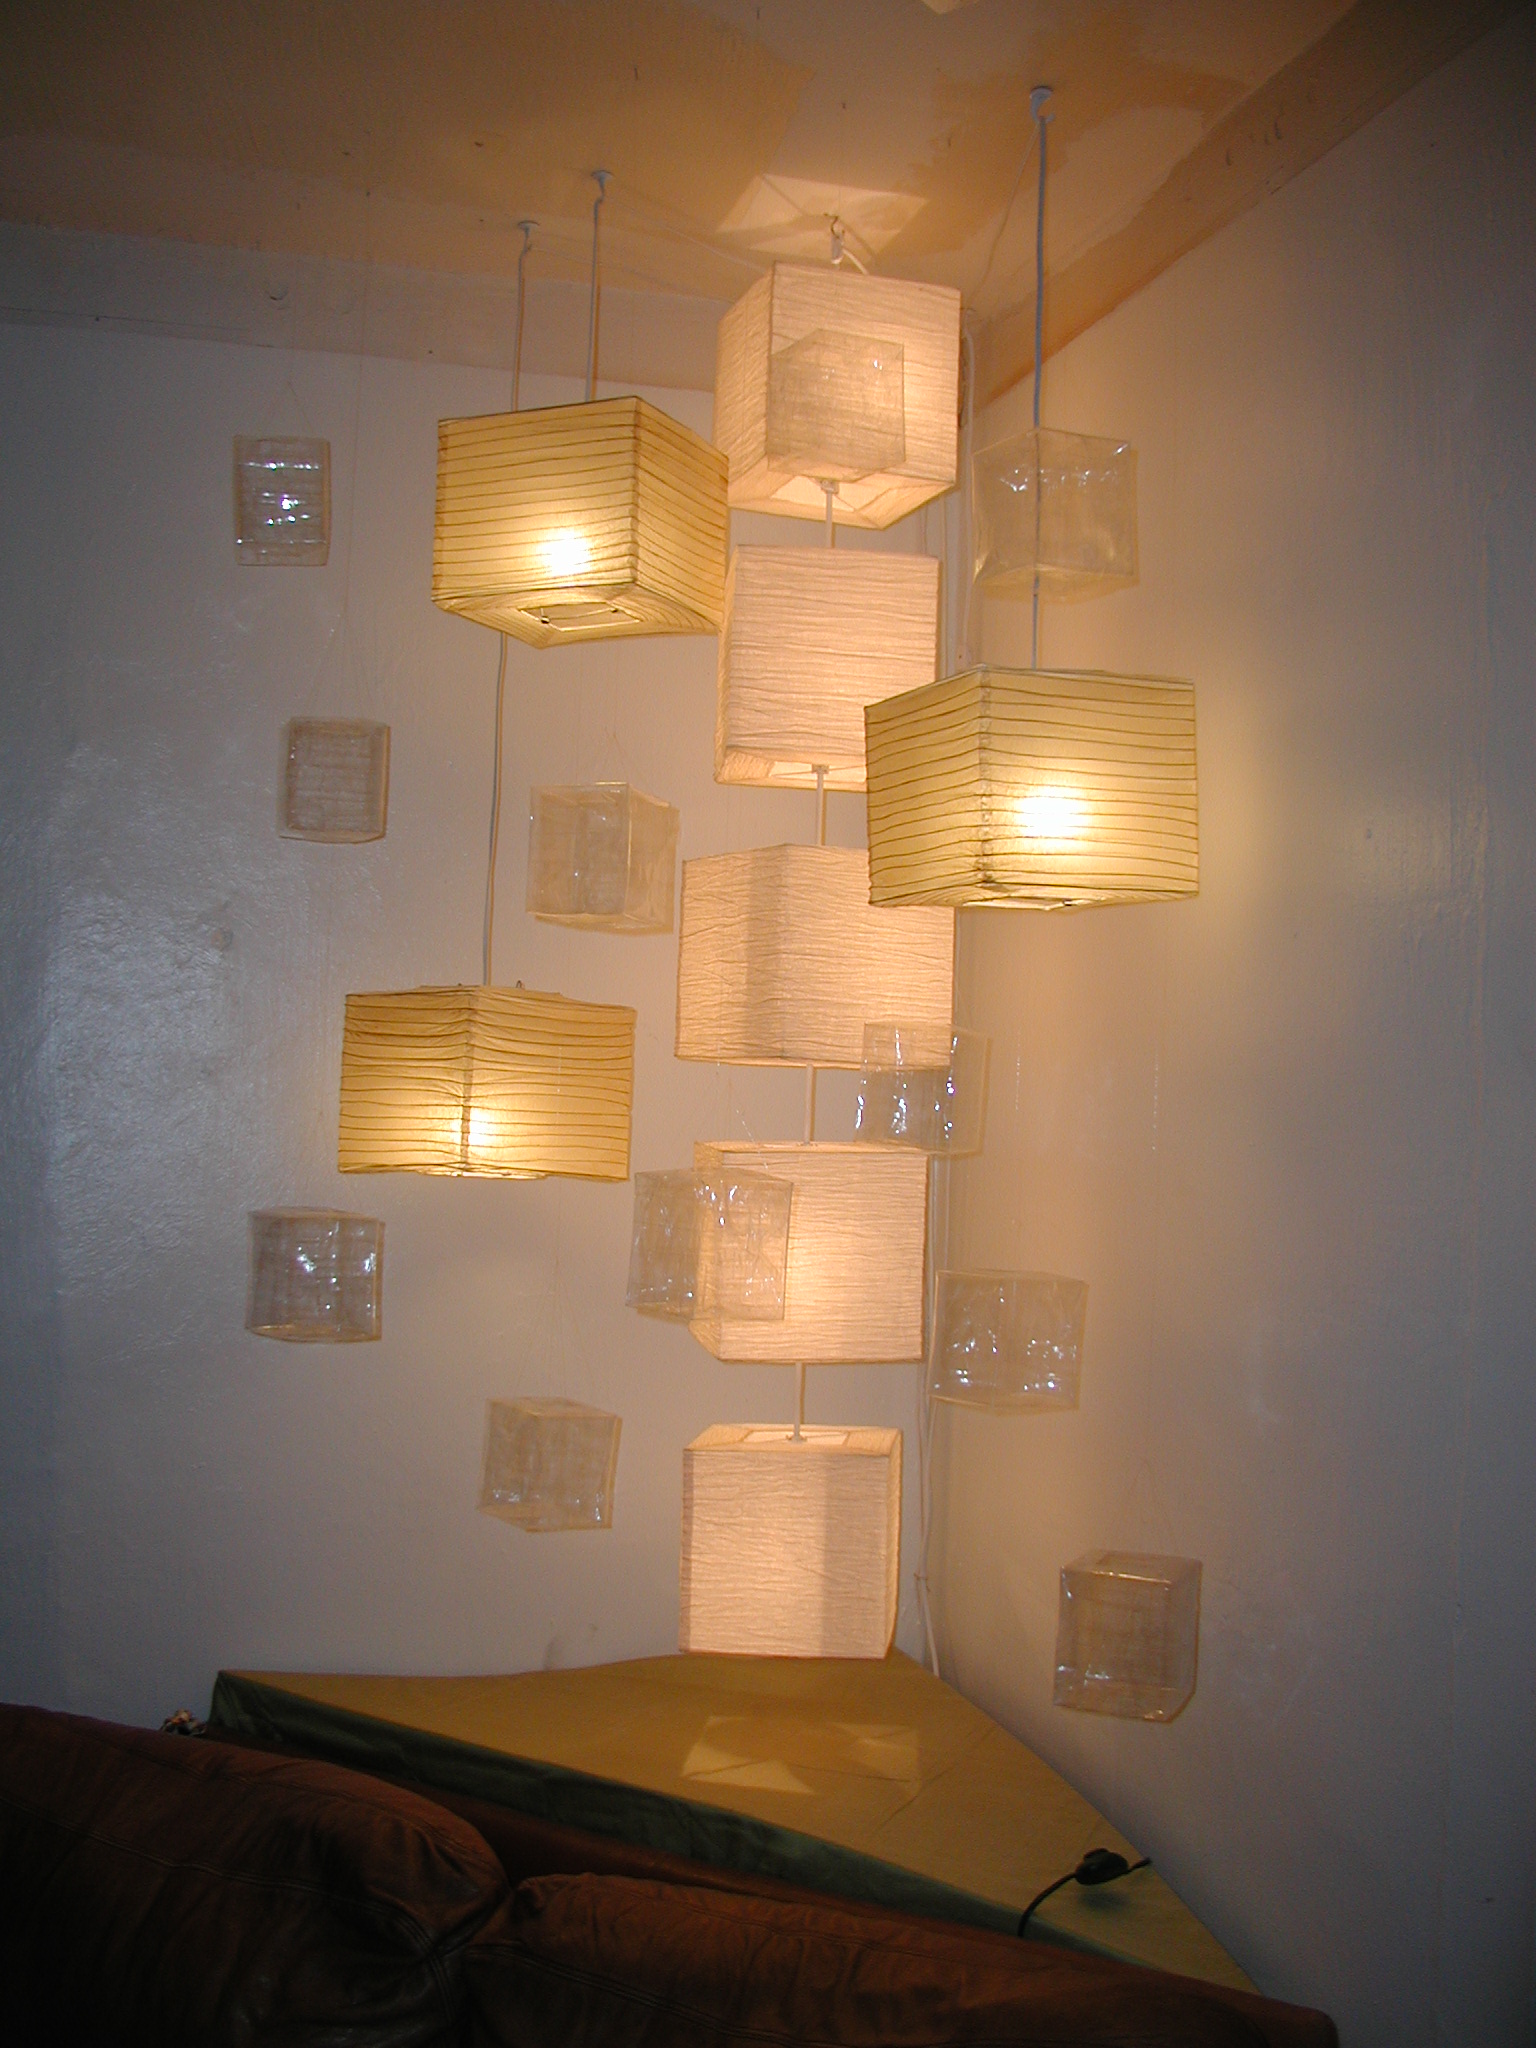
Crafty Intentions: Failed Results, Part 1
Just because I have Crafty Intentions doesn't mean I'm always successful at realizing them. In fact, I used to follow my inspirations to the end of every rainbow, and what I found often ranged from odd to meh to failure to disastrous.
I will detail some of those here for your entertainment, and we'll make this one short and sweet: Packing Tape Sculptures.

Why? I don't know.

Of what? Well, a single shoe makes as much sense as anything, right?
How about as many tissue-box sized cubes as possible, suspended mid-air? Yes. Success-ish.
Mermaid Unicorn Pattern EXPLAINED
This is a guide to the Mermaid Unicorn Mermicorn Hippocampus pattern.
(Yes, it is Hippocampus. Yes, that's also the name of part of the brain!)
There are two patterns available for the Crafty Intentions Mermaid Unicorns!

The main Mermaid Unicorn Pattern is available on both Ravelry and Etsy. This is a 39 page pattern in English (using American crochet terms). A Mermaid Unicorn from this pattern is approximately 11 inches tall from Hoof to Top of the Head (without Horn), about 4 inches wide from left to right side, and about 28 inches long from nose to the end of the Tail Fin using a 4.0mm G hook and worsted weight yarn. This pattern includes instructions for the Mermaid Unicorn body, head, ears, horn, two types of mane, front legs, Tail, Side, and Dorsal fins. With this pattern you can make a fully realized Mermaid Unicorn with or without wire for poseability.

The Add-On: Mermaid Unicorn Fins pattern is available on both Etsy and Ravelry. This is a 39 page pattern featuring instructions on how to make four additional fin styles to use in conjunction with the Main Mermaid Unicorn body. Style 1 of the fins is in the main pattern, style 2 through four are featured in this add-on. Style 2 includes all fins (Tail, Side and Dorsal) in the bottom right photo above. Style 3 includes all fins (Hoof, Leg, Mane, Ear) in the bottom left photo above. Style 3 includes all fins (Tail, hoof, mane, ear, side, dorsal) in the top left photo above. Style 4 includes all fins (Tail, Mane, Side, Dorsal) in the top right photo above. You will need to use this pattern with the Main pattern listed first as this add-on is only an expansion pack and does not contain instructions on creating the Mermaid Unicorn body.
© 2018 Megan Lapp, Crafty Intentions™. All rights reserved. This pattern is FOR PERSONAL USE ONLY. The pattern (or parts of it) may not be reproduced, distributed or resold, translated, published, altered, shared or posted (for sale or free) over the internet or offline. You can sell items made from this pattern, provided they are handmade by yourself in a limited number and you give credit to the designer. Please add the following lines to your item description and any item you are selling: “This item is handmade by (your name) from a design and pattern by Megan Lapp, Crafty Intentions™”.

Dragon Patterns EXPLAINED

This is a brief, but clear and complete explanation of each available Crafty Intentions Dragon pattern! Let's go Youngest to Oldest!
The Newborn Dragon Pattern is available on both Ravelry and Etsy. Newborn dragons are 4 inches tall from top of the head to bottom of the feet, and 8 inches long from the nose to the end of the tail if using about sport weight yarn with a D 3.25mm hook. It is a single 28 page pattern in English (using American crochet terms) and includes written and photographic instructions for 13 different body parts which you can selectively combine to make any style of Newborn Dragon you want. This is the only pattern you need to make the youngest, wittlest, baby dragons in the dragon family.

The Juvenile Dragon Pattern is available on both Ravelry and Etsy. Juvenile dragons are approximately 7 inches tall from the top of the head to the bottom of the feet, and approximately 14 inches from Nose to Tail tip. The Body is approximately 2 inches wide from side to side at the widest point, and the wings have an approximate 12 inch wing span if using about sport weight yarn with a D 3.25mm hook. It is a single 53 page pattern in English (using American crochet terms) and includes written and photographic instructions for 19 different body parts that you can selectively combine into many different body positions. This is the only pattern you need to make any kind of Juvenile Dragon you want.
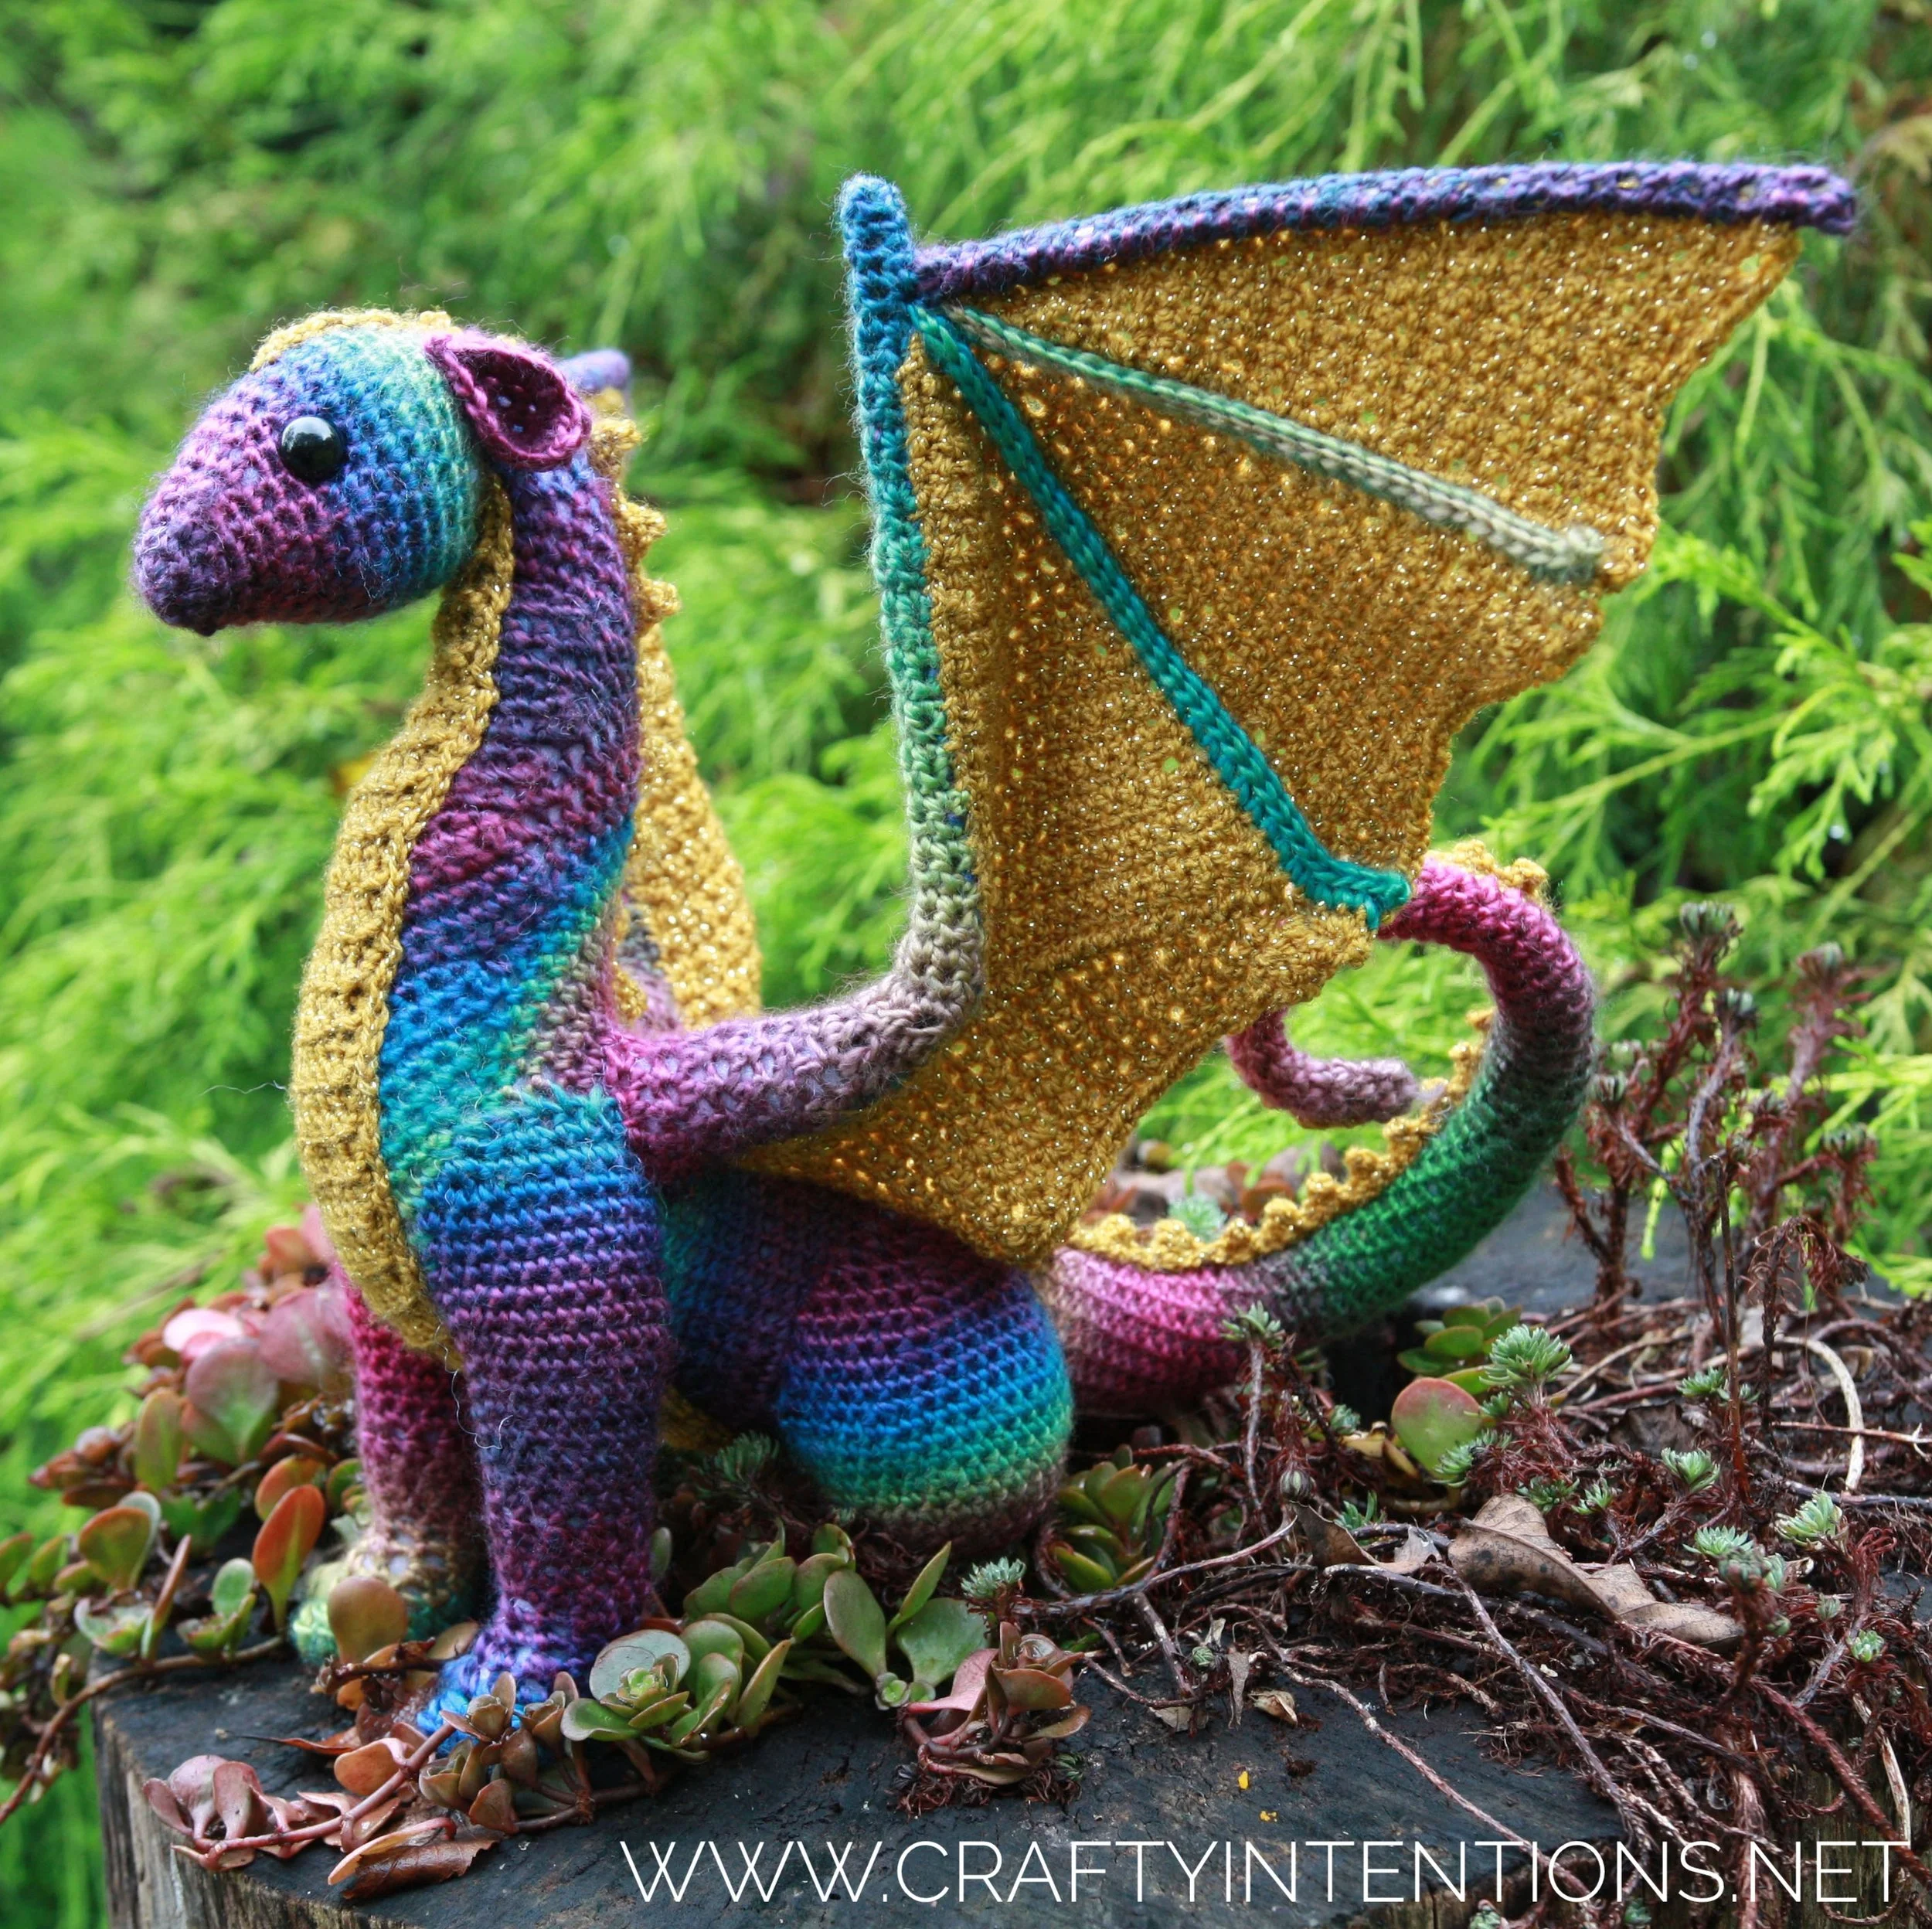
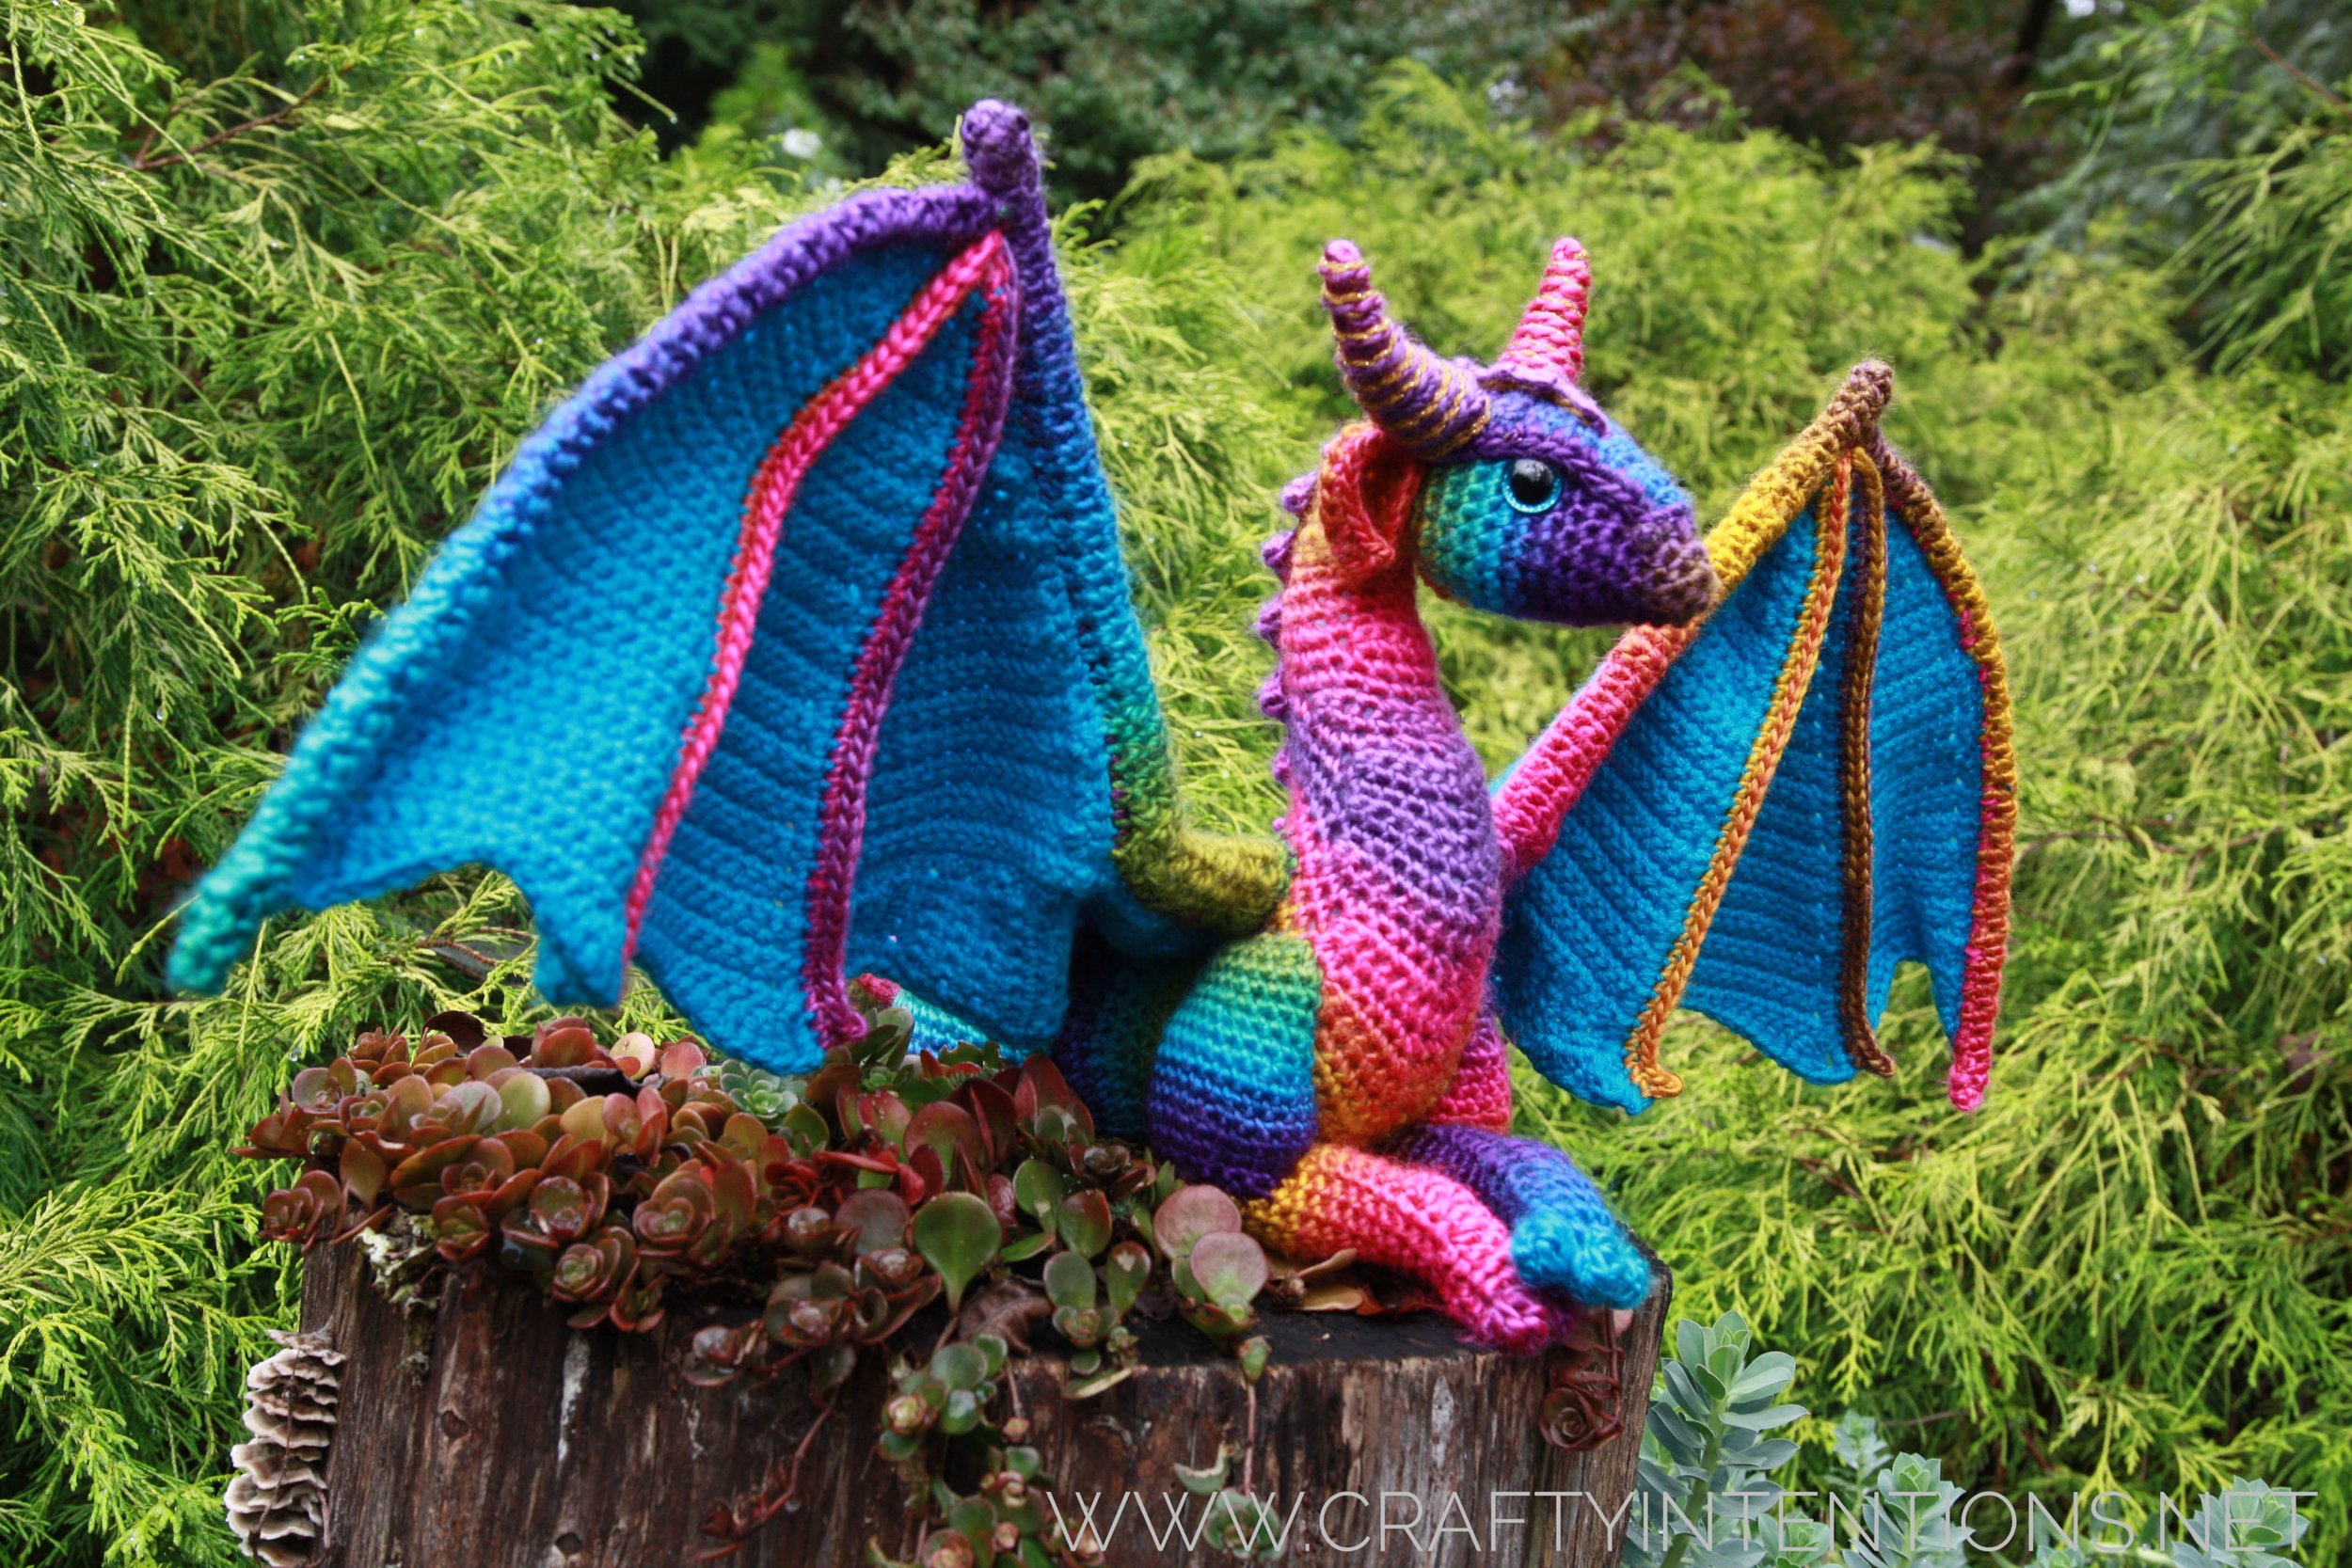
The main Adult Dragon Pattern is available on both Ravelry and Etsy. Adult Dragons are about 12 inches tall from head to toes, with 18 inches nose-to-tail, and 24 Inches from the tip of one wing to the other if using worsted weight yarn with a G 4.0mm. It is a single 37 page pattern in English (using American crochet terms) and German and includes written and photographic instructions for the sitting dragon you see in the picture above. It does include some extra ornamental bits so that you can customize your dragon, like 3 different ear styles, horns, and ridges. This contains all the instructions you need to make a basic sitting adult dragon. There are three add-on patterns available for the Adult Dragon.
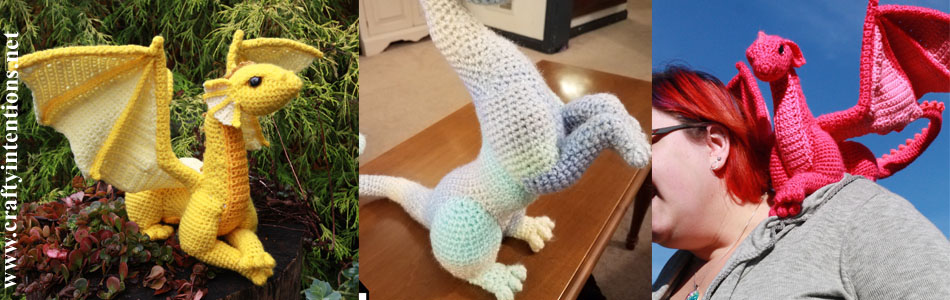
The Add-On Dragon: More Front Legs pattern is available on on both Ravelry and Etsy. This pattern features instructions to be used in conjunction with the Main pattern explained above. This pattern is for laying down front legs (as in the left picture above), perching bent front legs (as in the center picture above), and a tutorial on how to wear your laying down dragon on your shoulder! You will still need the Main pattern for all other instructions, this is just an expansion pack.
The Add-On Dragon: Epic Extra Large Wings pattern is available on both Etsy and Ravelry. This pattern features instructions on dragon wings that are approximately 35 inches wing tip to wing tip. These wings can be installed on any Adult Dragon body configuration. You will need to use this with the Main Dragon pattern (and any other Add-on Dragon pattern) as this is an expansion pack only and does not contain other instructions for the body of the dragon.

The Add-On Dragon: Extra Ornamentation pattern is available on Etsy and Ravelry. This pattern features instructions on how to create a head plate (1st photo on left above), a fancy head plate (4th photo above), a long droopy ear (1st photo on left above), a curly eye piece (3rd photo above), a three color back-spikes (2nd photo above), a large spiral horn with accent color (1st photo on left above) and a spiral shaped horn (not pictured)! You will need to use this with the Main Dragon pattern (and any other Add-on Dragon pattern) as this is an expansion pack only and does not contain other instructions for the body of the dragon.
© 2017 Megan Lapp, Crafty Intentions™. All rights reserved. This pattern is FOR PERSONAL USE ONLY. The pattern (or parts of it) may not be reproduced, distributed or resold, translated, published, altered, shared or posted (for sale or free) over the internet or offline. You can sell items made from this pattern, provided they are handmade by yourself in a limited number and you give credit to the designer. Please add the following lines to your item description and any item you are selling: “This item is handmade by (your name) from a design and pattern by Megan Lapp, Crafty Intentions™”.
Status: Broken
In April, on Friday the Thirteenth, I broke my 5th metacarpal bone - the one on the side of my dominant hand. I did it in the silliest, stupidest way possible. An ant surprised me by touching my hand while I was writing my to-do list for the day, and I instinctively karate chopped it. Post-chop, the ant was no where to be found, and my hand hurt on a level best communicated in four letter words at top volume without children present. X-rays showed it to be a spiral fracture, and those words ("Spiral Fracture") tend to illicit a sharp hiss and eyebrows raised in pity from doctors and nurses alike. I needed an immediate cast, though surgery was not necessary. This being my first ever broken bone, I was strongly tempted to get a hot pink plaster cast, but was talked out of it by my husband. I opted for a state of the art, black, moldable brace. I still can't take it off for any reason, but at least it's a little lighter, a little sleeker and maybe a little more comfortable. The doctors lied and told me it would be 4 weeks total in the cast. After 3 weeks and an x-ray, I was told it will be another 2.5 weeks "at least". In the intervening time I have published three new patterns, created a facebook community page for people working on my patterns, designed this website, re-organized every nook and cranny of my crafty life, painted my cast and have been going slowly insane. I need my hand back. I have no idea what to do next, but it won't be designing more crochet patterns. Unfortunately, that will have to wait until the cast comes off.

One Year

On April 29th 2017, I published my first original amigurumi crochet pattern under the banner of Crafty Intentions. I have spent one full year writing, testing, developing, editing and publishing my own patterns and it has been a year-long crash course in business. While it has been equal parts thrilling and stressful, I am so excited to continue doing what I love. I finally figured out what I want to be when i grow up: Me.
I'll be using this space to occasionally share exciting happenings that Crafty Intentions will be part of, and new and upcoming patterns. If you have questions or suggestions please see my contact page and send me a message!
© 2017 Megan Lapp, Crafty Intentions™. All rights reserved. This pattern is FOR PERSONAL USE ONLY. The pattern (or parts of it) may not be reproduced, distributed or resold, translated, published, altered, shared or posted (for sale or free) over the internet or offline. You can sell items made from this pattern, provided they are handmade by yourself in a limited number and you give credit to the designer. Please add the following lines to your item description and any item you are selling: “This item is handmade by (your name) from a design and pattern by Megan Lapp, Crafty Intentions™”.